반응형

나는 라즈베리파이로 많은 프로젝트를 했다. 개인적으로 많이 가지고 놀기도 했고 특히 미니 해서 좋아했다. 위 사진은 내가 지금 가지고 있는 라즈베리파이들이다. 더 있지만 깔끔하게 관리되고 있는 것들로 사진을 찍었다.

그러다 보니 관련 문서도 자주 찾아보게 되고, Reddit에서 재밌는 프로젝트도 찾아보곤 한다.

많은 사람들이 balenaEtcher 프로그램을 이용해서 SD카드에 라즈비안을 굽는다. 나 또한 그랬다.

하지만 요즘엔 Raspberry Pi imager를 이용한다.


Raspberry Pi imager를 사용하는 이유.
  • 첫 번째 : balenaEtcher를 이용하면 라즈비안 OS도 별도로 설치해야 한다. 하지만 Raspberry Pi imager를 사용하면 별도의 OS 없이 라즈비안을 SD카드에 설치할 수 있다.
  • 두 번째 : 라즈비안 OS 설정을 Raspberry Pi imager에서 바로 설정할 수 있다.

나는 두 번째 이유 때문에 Raspberry Pi imager를 사용한다.

보통 처음 라즈베리파이를 사용하는 사람은 Full OS(GUI 포함)를 사용한다. 하지만 조금 사용하다 보면, 100에 99는 LITE OS를 설치하여 SSH로 접속한다.

SSH 접속하는 방법은 간단하다. 다만, 매번 설정하는 것이 귀찮다.


Raspberry Pi SSH 설정 (SD 카드 Flash 성공했다는 가정 하에)
  • SSH enable : ssh (확장자명 없이 빈 파일 생성)
  • WiFi 설정 : wpa_supplicant.conf (파일 생성) WiFi 5GHz 대신 2.4GHz 지향
  • Port fowarding : 기본 SSH 포트 번호 => 22
ctrl_interface=DIR=/var/run/wpa_supplicant GROUP=netdev
network={
    ssid="{WiFi 아이디}"
    psk="{WiFi 비밀번호}"
    key_mgmt=WPA-PSK
}

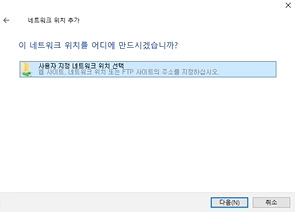
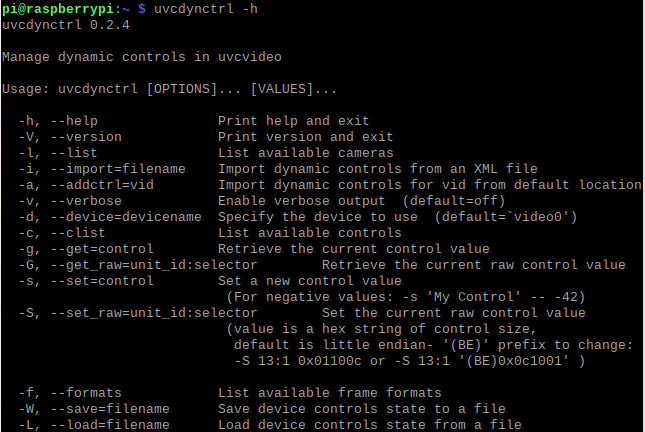
대부분 사람들이 위 방법으로 SSH를 설정한다. 하지만 이것도 한두 번이지 굉장히 귀찮은 작업이다. 이제 내가 추천하는 방법이다. 바로 Raspberry Pi imager를 이용하는 방법이다. 파일을 생성하고, 코드를 작성할 필요도 없다. 모두 GUI 선에서 해결할 수 있다.


추천 :Raspberry Pi imager를 이용하여 Raspberry Pi SSH 설정
  • Raspberry Pi imager 설치 (공식 홈페이지)

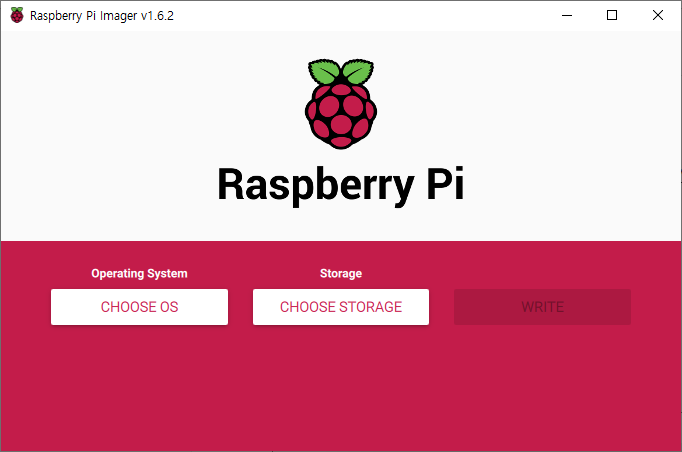
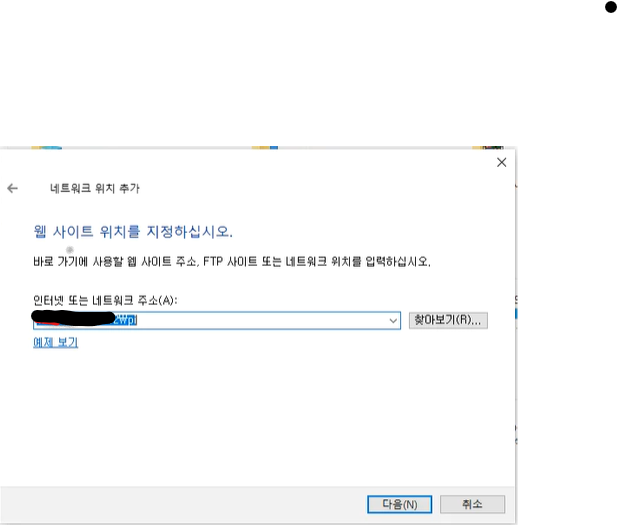
- 설치가 완료되면 아래와 같이 프로그램을 실행한다.

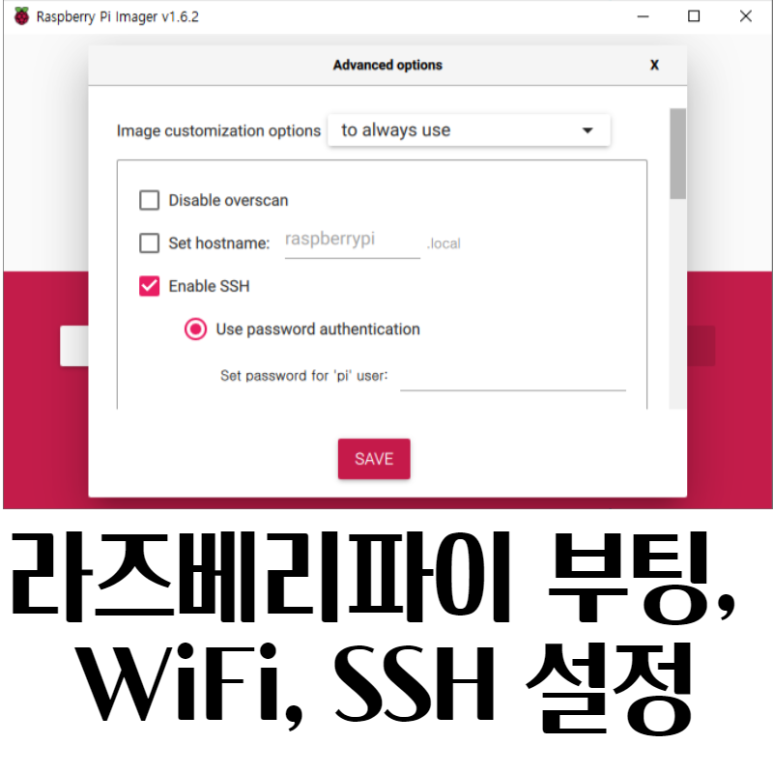
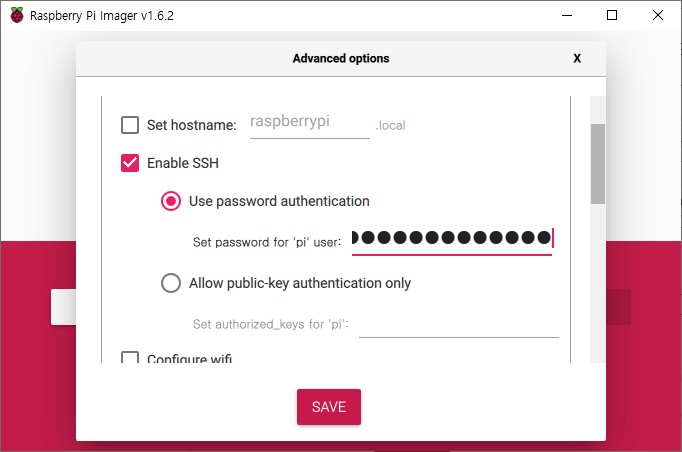
  • Advanced options (Ctrl + Shift + X)

- 컨트롤, 시프트, X 키를 동시에 누르면, 기본 옵션을 설정할 수 있는 창이 아래와 같이 보인다.

- 이 설정값을 매번 사용하고 싶으면 [for this session only][to always use]로 변경한다.

- set hostname : host name이다. 디폴트는 raspberrypi이다. 굳이 변경하지 않아도 된다.

- Enable SSH : SSH 활성화, 활성화하려면, 체크하면 된다. 초기 비밀번호를 변경할 수 있다. default는 raspberry이다.

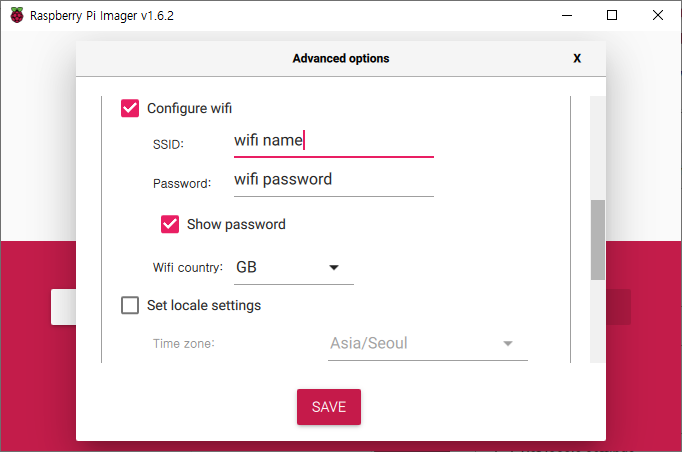
- Configure wifi : 연결하고 싶은 WiFi 이름과 비밀번호를 입력한다. 단, 5GHz WiFi는 안된다. 항상 2.4GHz WiFi를 선택해야 한다.

위 GUI 방식으로 WiFi와 SSH를 설정하면, 실수도 줄어들고 빠르고 직관적으로 내 라즈베리파이를 설정할 수 있다. 지금까지 SD카드에 일일이 설정했다면, 이제 Raspberry Pi imager를 사용하길 바란다.

728x90
반응형
반응형

안녕하세요. 


프로젝트를 위해 라즈베리파이를 게이트웨이로 써야 하므로, GUI 없는 RaspberryPi OS LITE를 이용하기 시작했습니다.


SSH는 원격 호스트 컴퓨터로 접속하기 위해 정의된 인터넷 프로토콜로 포트 번호는 22번을 사용합니다.


1. SD Card에 OS Image Flash 

    - Requirement

  • Raspberry Pi OS ( Raspberry Pi OS Lite )
  • belena etcher ( Flash OS images to SD cards & USB drives )

https://www.raspberrypi.org/software/operating-systems/#raspberry-pi-os-32-bit


Operating system images – Raspberry Pi

The Raspberry Pi is a tiny and affordable computer that you can use to learn programming through fun, practical projects. Join the global Raspberry Pi community.

www.raspberrypi.org


2. Flash Success 성공 시

  • SSH enable -> ssh (확장자명 없이 빈 파일 생성)
  • WiFi 연결 -> wpa_supplicant.conf (파일 생성)
ctrl_interface=DIR=/var/run/wpa_supplicant GROUP=netdev
network={
    ssid="wifi-Name"
    psk="wifi-PW"
    key_mgmt=WPA-PSK
}

참고로 5GHz 대신 2.4GHz를 쓰는걸 지향함.


3. Raspberry Pi에 SD카드 넣고 전원을 인가 시

위 과정을 제대로 했다면, 라즈베리파이가 WiFi에 연결이 되었을 것.


공유기 관리자 모드에 들어가 현재 라즈베리파이가 Local IP가 어떻게 되는지 확인한다. ex) 192.168.x.x


Local IP를 확인하였다면, 포트포워딩을 한다. 자세한 설명은 아래 링크를 걸어둠. 주피터 노트북 서버 관련된 내용이지만, 포트포워딩에 대해 최대한 쉽게 설명해둠.

https://coding-yoon.tistory.com/152


주피터 노트북 개인 딥러닝 서버 만들기 ! (1) with Window10, Pytorch

이번에 컴퓨터를 맞추면서 그래픽카드 RTX 2060 super를 구매했습니다. 저만의 딥러닝 서버를 만들어 놓으면 어디서든 야외에서 노트북으로 가볍게 작업할 수 있습니다. ( 얼마나 작업을 할지 모르

coding-yoon.tistory.com

위를 제대로 했다면, putty나 teraterm을 이용해 접속한다. (teraterm을 추천, 이유는 다음 글에)

pi@raspberrypi:~ $ 명령어 입력

 pi : ID

 raspberrypi : Hostname

1. 라즈베리파이 첫 부팅 시, ID와 PW는 각각 pi, raspberry 
2. 라즈베리파이 첫 부팅 시, Hostname은 raspberrypi
3. SSH 기본 포트 번호는 22번


--------------- 선택사항 ---------------

4. SSH 포트 번호 변경

pi@raspberrypi:~ $ sudo apt-get update
pi@raspberrypi:~ $ sudo apt-get upgrade
pi@raspberrypi:~ $ sudo apt-get install vim

pi@raspberrypi:~ $ sudo vim /etc/ssh/sshd_config

vim을 설치해도 되고, 혹은 nano로 해도 된다. 하지만 vim이 편하기 때문에 vim을 설치. 


https://coding-yoon.tistory.com/99?category=898799 


Vim 사용법

Vim 사용법 [저장 & 끄기] esc - :w : 저장 esc - :q : 끄기 esc - :wq : 저장하고 끄기 [입력모드] i [붙여넣기] esc - p : 붙여 넣기 ctrl + shift + v  : 외부에서 붙여넣기 [되..

coding-yoon.tistory.com

#Port 22 주석을 풀고 Port {원하는 숫자} 

# This sshd was compiled with PATH=/usr/bin:/bin:/usr/sbin:/sbin

# The strategy used for options in the default sshd_config shipped with
# OpenSSH is to specify options with their default value where
# possible, but leave them commented.  Uncommented options override the
# default value.

#Port 22
#AddressFamily any
#ListenAddress 0.0.0.0
#ListenAddress ::

#HostKey /etc/ssh/ssh_host_rsa_key
#HostKey /etc/ssh/ssh_host_ecdsa_key


5. SSH로 root 계정으로 접속

현재 상태로는 SSH에서 Access Denied로 root 계정 접근 불가

$sudo vim /etc/ssh/sshd_config

####### sshd_config #######
# PermitRootLogin yes 추가

# Authentication: 

#LoginGraceTime 2m 
#PermitRootLogin prohibit-password 
PermitRootLogin yes 
#StrictModes yes 
#MaxAuthTries 6 
#MaxSessions 10
//root 계정 활성화
$sudo passwd root

//재시작
$sudo reboot

// 루트 계정 접속
// ID : root
// PW : 설정한 비밀번호


6.  ID & Hostname 변경 ( 루트 계정 접속 상태 ) 

1. ID 변경

usermod -l {원하는 ID명} pi

2. Hostname 변경

$sudo raspi-config

# network option -> hostname -> {원하는 호스트명} 변경
# password 변경
# language -> US | KR | UTF
# time -> Asia -> Seoul
# WiFi -> US, UK


7.  root 계정 비활성화

$sudo passwd -l root


728x90
반응형
반응형

삼바(samba)는 Windows 운영체제를 사용하는 PC에서 Linux 또는 UNIX 서버에 접속하여 파일이나 프린터를 공유하여 사용할 수 있도록 해 주는 소프트웨어이다. -위키백과


현재 라즈베리파이를 공유폴더로 사용하여 윈도우에서 작업하는데 많이 사용합니다. 


vim으로 작업을 해봤고, 라즈베리파이에서 vscode를 깔아서 작업도 해봤고, 기본 파이썬 툴로도 해봤지만 

코드는 길어지고, 여러 파일 작업을 할 때 답답해서 죽는 줄 알았습니다. 


그래서 가장 좋은 방법은 SSH나 VNC로 라즈베리파이를 모니터 없이 연결만 해놓고, 작업은 윈도우에서 하는 게 가장 

편한 것 같습니다. 


1. 설치

sudo apt-get install samba samba-common-bin

2. 설정

sudo vim /etc/samba/smb.conf

path = 자신이 공유하고자는 폴더

create mask = 권한 ( 상남자가 아니라면 777로 주지 않기 ) 

sudo smbpasswd -a pi

재시작 

# stop 
sudo /etc/init.d/smbd stop
# start
sudo /etc/init.d/smbd start


이 부분까지는 구글에 samba만 쳐도 바로 나오는 내용


제 윈도우 PC는 공인 IP로 직접 잡혀있고, Raspberry Pi는 Local로 잡혀 있어 포트 포워딩을 해야 하는 상황


공유기 관리자 모드로 들어갑니다. 

Raspi4 smb처럼 TCP포트에 139번(TCP)와 445번(TCP) 포트포워딩 합니다. 


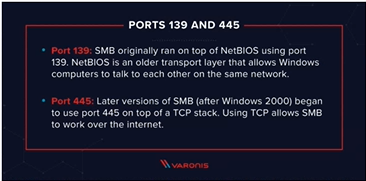
Port 139: SMB originally ran on top of NetBIOS using port 139. NetBIOS is an older transport layer that allows Windows computers to talk to each other on the same network.


Port 445: Later versions of SMB (after Windows 2000) began to use port 445 on top of a TCP stack. Using TCP allows SMB to work over the internet.


www.varonis.com/blog/smb-port/


정확히 역할을 알고 싶으시면 위 사이트를 참고하세요. 


하지만, 블로그를 찾아 보면 보안에 굉장히 취약하기 때문에 추천하지 않는 곳이 많습니다.


그 이유는 CIFS + Samba 에서 CIFS1.0이 랜섬웨어에 굉장히 취약하기 때문입니다. 


바바리맨을 잡겠다고, 바바리를 못입게 하면 안되잖아요?


그래서 해결방법으로 Samba protocol version을 업그레이드 해서 보안을 강화하는 것입니다. 


www.cyberciti.biz/faq/how-to-configure-samba-to-use-smbv2-and-disable-smbv1-on-linux-or-unix/


How to configure Samba to use SMBv2 and disable SMBv1 on Linux or Unix - nixCraft

Explains how to configure Samba to use SMBv2/SMBv3 and disable SMBv1 on Linux or Unix-like systems for security reasons such as WannaCrypt/WannaCry.

www.cyberciti.biz


그런데 굳이 위를 안해주셔도 됩니다. 누가 교육용 라즈베리파이를 해킹할까요?


포트포워딩까지 하셨으면, 윈도우에서 네트워크 접근하겠습니다.


1
2


3
4


5

접근 성공

728x90
반응형
반응형

안녕하세요. 오랜만에 글을 작성합니다. 


오늘은 예제만 돌려봤다면, 실제로 학습된 모델을 이용하여 얼굴을 찾도록 하겠습니다. 


라즈베리파이로 얼굴인식을 찾아보면 Haarcascade 알고리즘이 많이 사용됩니다. 


하지만 오래전에 나온 알고리즘이고 좀 더 빠르고 더 정확하게 인공지능으로 얼굴 인식을 할 수 있습니다.


그리고 얼굴인식 자체를 Edge TPU가 처리하기 때문에 라즈베리파이의 CPU는 거의 사용되지 않습니다. 


그러기 때문에 라즈베리파이에서 부담 없이 강력한 효과를 보여줍니다. 


아래 글을 읽어보시고 가시는 것을 추천드립니다. 


coding-yoon.tistory.com/87?category=866905

coding-yoon.tistory.com/88?category=866905

coding-yoon.tistory.com/91?category=866905


[Coral] TensorFlow Lite : Tflite 모델 생성 & Edge TPU로 Inferece까지 간단하게 개발하기!

안녕하세요. 만약, 처음 이 글을 보신다면 아래 글을 먼저 읽어보시는 것을 추천드립니다. 1편 : Coral Board 대신 라즈베리파이를 사용하는 이유 : https://coding-yoon.tistory.com/85?category=866905 2편 :..

coding-yoon.tistory.com


우선, coral에서 Face detection tflite 파일을 먼저 받겠습니다. 

coral.ai/models/


Models | Coral

Download pre-compiled demo models that are compatible with the Edge TPU, or use the model source files to retrain the models for your own applications

coral.ai

위 파일 Edge TPU model을 눌러 파일을 받습니다.

ssd_mobilenet_v2_face_quant_postprocess_edgetpu.tflite
6.39MB

네트워크는 경량 된 MobileNet V2와 객체인식 SSD(Single Shot MultiBox Detection)으로 학습된 모델입니다. 

궁금하시면 두 논문을 참고하시면 될 것 같습니다.


arxiv.org/abs/1801.04381


MobileNetV2: Inverted Residuals and Linear Bottlenecks

In this paper we describe a new mobile architecture, MobileNetV2, that improves the state of the art performance of mobile models on multiple tasks and benchmarks as well as across a spectrum of different model sizes. We also describe efficient ways of app

arxiv.org

arxiv.org/abs/1512.02325


SSD: Single Shot MultiBox Detector

We present a method for detecting objects in images using a single deep neural network. Our approach, named SSD, discretizes the output space of bounding boxes into a set of default boxes over different aspect ratios and scales per feature map location. At

arxiv.org


detect.py (google git에서 구할 수 있음)

# Lint as: python3
# Copyright 2019 Google LLC
#
# Licensed under the Apache License, Version 2.0 (the "License");
# you may not use this file except in compliance with the License.
# You may obtain a copy of the License at
#
#     https://www.apache.org/licenses/LICENSE-2.0
#
# Unless required by applicable law or agreed to in writing, software
# distributed under the License is distributed on an "AS IS" BASIS,
# WITHOUT WARRANTIES OR CONDITIONS OF ANY KIND, either express or implied.
# See the License for the specific language governing permissions and
# limitations under the License.
"""Functions to work with detection models."""

import collections
import numpy as np

Object = collections.namedtuple('Object', ['id', 'score', 'bbox'])


class BBox(collections.namedtuple('BBox', ['xmin', 'ymin', 'xmax', 'ymax'])):
  """Bounding box.
  Represents a rectangle which sides are either vertical or horizontal, parallel
  to the x or y axis.
  """
  __slots__ = ()

  @property
  def width(self):
    """Returns bounding box width."""
    return self.xmax - self.xmin

  @property
  def height(self):
    """Returns bounding box height."""
    return self.ymax - self.ymin

  @property
  def area(self):
    """Returns bound box area."""
    return self.width * self.height

  @property
  def valid(self):
    """Returns whether bounding box is valid or not.
    Valid bounding box has xmin <= xmax and ymin <= ymax which is equivalent to
    width >= 0 and height >= 0.
    """
    return self.width >= 0 and self.height >= 0

  def scale(self, sx, sy):
    """Returns scaled bounding box."""
    return BBox(xmin=sx * self.xmin,
                ymin=sy * self.ymin,
                xmax=sx * self.xmax,
                ymax=sy * self.ymax)

  def translate(self, dx, dy):
    """Returns translated bounding box."""
    return BBox(xmin=dx + self.xmin,
                ymin=dy + self.ymin,
                xmax=dx + self.xmax,
                ymax=dy + self.ymax)

  def map(self, f):
    """Returns bounding box modified by applying f for each coordinate."""
    return BBox(xmin=f(self.xmin),
                ymin=f(self.ymin),
                xmax=f(self.xmax),
                ymax=f(self.ymax))

  @staticmethod
  def intersect(a, b):
    """Returns the intersection of two bounding boxes (may be invalid)."""
    return BBox(xmin=max(a.xmin, b.xmin),
                ymin=max(a.ymin, b.ymin),
                xmax=min(a.xmax, b.xmax),
                ymax=min(a.ymax, b.ymax))

  @staticmethod
  def union(a, b):
    """Returns the union of two bounding boxes (always valid)."""
    return BBox(xmin=min(a.xmin, b.xmin),
                ymin=min(a.ymin, b.ymin),
                xmax=max(a.xmax, b.xmax),
                ymax=max(a.ymax, b.ymax))

  @staticmethod
  def iou(a, b):
    """Returns intersection-over-union value."""
    intersection = BBox.intersect(a, b)
    if not intersection.valid:
      return 0.0
    area = intersection.area
    return area / (a.area + b.area - area)


def input_size(interpreter):
  """Returns input image size as (width, height) tuple."""
  _, height, width, _ = interpreter.get_input_details()[0]['shape']
  return width, height


def input_tensor(interpreter):
  """Returns input tensor view as numpy array of shape (height, width, 3)."""
  tensor_index = interpreter.get_input_details()[0]['index']
  return interpreter.tensor(tensor_index)()[0]


def set_input(interpreter, size, resize):
  """Copies a resized and properly zero-padded image to the input tensor.
  Args:
    interpreter: Interpreter object.
    size: original image size as (width, height) tuple.
    resize: a function that takes a (width, height) tuple, and returns an RGB
      image resized to those dimensions.
  Returns:
    Actual resize ratio, which should be passed to `get_output` function.
  """
  width, height = input_size(interpreter)
  w, h = size
  scale = min(width / w, height / h)
  w, h = int(w * scale), int(h * scale)
  tensor = input_tensor(interpreter)
  tensor.fill(0)  # padding
  _, _, channel = tensor.shape
  tensor[:h, :w] = np.reshape(resize((w, h)), (h, w, channel))
  return scale, scale


def output_tensor(interpreter, i):
  """Returns output tensor view."""
  tensor = interpreter.tensor(interpreter.get_output_details()[i]['index'])()
  return np.squeeze(tensor)


def get_output(interpreter, score_threshold, image_scale=(1.0, 1.0)):
  """Returns list of detected objects."""
  boxes = output_tensor(interpreter, 0)
  class_ids = output_tensor(interpreter, 1)
  scores = output_tensor(interpreter, 2)
  count = int(output_tensor(interpreter, 3))

  width, height = input_size(interpreter)
  image_scale_x, image_scale_y = image_scale
  sx, sy = width / image_scale_x, height / image_scale_y

  def make(i):
    ymin, xmin, ymax, xmax = boxes[i]

    return Object(
        id=int(class_ids[i]),
        score=float(scores[i]),
        bbox=BBox(xmin=xmin,
                  ymin=ymin,
                  xmax=xmax,
                  ymax=ymax).scale(sx, sy).map(int))

  return [make(i) for i in range(count) if scores[i] >= score_threshold]


main.py

import detect
import tflite_runtime.interpreter as tflite
import time

from PIL import Image
from PIL import ImageDraw
import cv2
import numpy as np
import time
import os


# .tflite interpreter
interpreter = tflite.Interpreter(
    os.path.join(os.getcwd(), "ssd_mobilenet_v2_face_quant_postprocess_edgetpu.tflite"),
    experimental_delegates=[tflite.load_delegate('libedgetpu.so.1')]
    )
interpreter.allocate_tensors()

# Draws the bounding box and label for each object.
def draw_objects(image, objs):
    for obj in objs:
        bbox = obj.bbox
        
        cv2.rectangle(image,(bbox.xmin, bbox.ymin), (bbox.xmax, bbox.ymax), (0, 255, 0),2)

        bbox_point_w = bbox.xmin + ((bbox.xmax-bbox.xmin) // 2)
        bbox_point_h = bbox.ymin + ((bbox.ymax-bbox.ymin) // 2) 
        
        cv2.circle(image, (bbox_point_w, bbox.ymax-bbox.ymin), 5, (0,0,255),-1)
        cv2.putText(image, text='%d%%' % (obj.score*100), org=(bbox.xmin, bbox.ymin), fontFace=cv2.FONT_HERSHEY_SIMPLEX, fontScale=1.0, color=(0, 255, 0), thickness=1, lineType=cv2.LINE_AA)


def main():
    cap = cv2.VideoCapture(0)    

    while True:
        ret, image = cap.read()

	    # image reshape
        image = cv2.resize(image, dsize=(320, 320), interpolation=cv2.INTER_AREA)
	    # image BGR to RGB
        image = cv2.cvtColor(image,cv2.COLOR_BGR2RGB)

       	tensor = detect.input_tensor(interpreter=interpreter)[:, :] = image.copy() 
        tensor.fill(0)  # padding        
        interpreter.invoke()  # start
        
        objs = detect.get_output(interpreter, 0.5, (1.0, 1.0))
        
        if len(image):
            draw_objects(image, objs)

        image = cv2.cvtColor(image,cv2.COLOR_RGB2BGR)
        cv2.imshow('face detector', image)

        k = cv2.waitKey(30) & 0xff
        if k == 27: # press 'ESC' to quit # ESC exit
            break


if __name__ == '__main__':
    main()


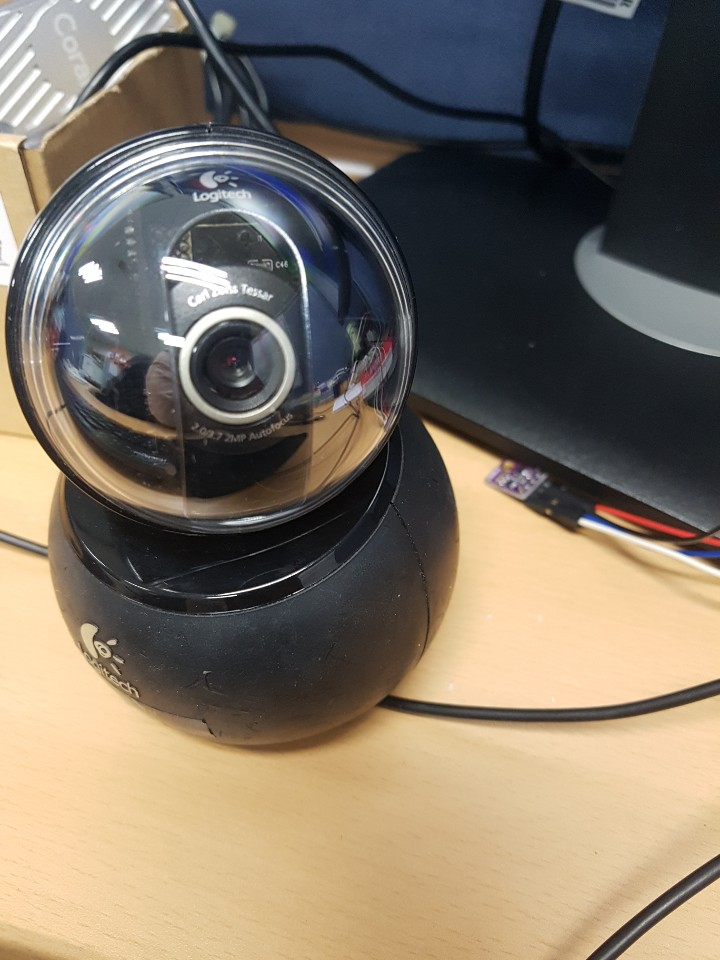
위 코드를 돌려보시면, delay가 전혀 없이 높은 성능으로 얼굴 인식을 합니다. 


그렇기 때문에 얼굴 인식하고 다른 프로세스를 추가할 수 있습니다. 예를 들어 얼굴 인식하고 마스크를 검출하더라도 

전혀 delay가 없습니다.


그리고 얼굴인식을 하기 전,  전처리가 없습니다. 


딥러닝으로 만든 모델을 돌려보면, 실제로 적용되지 않는 경우가 많습니다. 


만들어진 모델을 성능을 높이기 위해 OpenCV의 전처리를 많이 사용하는 경우가 많습니다. 


하지만 이 같은 경우는 OpenCV는 사이즈를 줄이거나, 단순히 View 역할만 하고 그 외 작업은 전혀 하지 않습니다. 


마스크를 쓰지 않았을 때
마쓰크를 썻을 때

딥러닝을 공부하신다면, 실제로 모델을 적용해보시는 것도 많은 공부를 하는데 도움이 될 것 같습니다. 

728x90
반응형
반응형


USB 웹캠을 하나 주워 왔는데 동작이 잘돼서 라즈베리파이에 달아주기로 했습니다.


웹캠 제품은 Logitech Orbit/Sphere AF입니다. 


uvcdynctrl 를 통해서 webcam에 Pan/Tilt를 조정할 예정입니다. 


0. uvcdynctrl 설치

sudo apt-get install uvcdynctrl 


1. uvdynctrl 도움말

uvcdynctrl -h


2. uvdynctrl 사용 가능한 장치 리스트 확인

uvcdynctrl -c


2. uvdynctrl 컨트롤

Controls that work

# uvcdynctrl -s "Pan/tilt Reset" -- 1
# uvcdynctrl -s "Pan/tilt Reset" -- 2
# uvcdynctrl -s "Pan/tilt Reset" -- 3

# uvcdynctrl -s "Pan (relative)" -- -700
$ uvcdynctrl -s "Pan (relative)" -- 700

# uvcdynctrl -s "Tilt (relative)" -- -500
# uvcdynctrl -s "Tilt (relative)" -- 500

# uvcdynctrl -s "Brightness" -- 1
# uvcdynctrl -s "Brightness" -- 255

# uvcdynctrl -s "Contrast" -- 1
# uvcdynctrl -s "Contrast" -- 255

# uvcdynctrl -s "Saturation" -- 1
# uvcdynctrl -s "Saturation" -- 255

# uvcdynctrl -s "Gain" -- 1
# uvcdynctrl -s "Gain" -- 255

# uvcdynctrl -s "Backlight Compensation" -- 0
# uvcdynctrl -s "Backlight Compensation" -- 1
# uvcdynctrl -s "Backlight Compensation" -- 2


# uvcdynctrl -s "Power Line Frequency" -- 0
# uvcdynctrl -s "Power Line Frequency" -- 1
# uvcdynctrl -s "Power Line Frequency" -- 2

# uvcdynctrl -s "White Balance Temperature" -- x

# uvcdynctrl -s "LED1 Mode" -- 0 LED off
# uvcdynctrl -s "LED1 Mode" -- 1 LED on
# uvcdynctrl -s "LED1 Mode" -- 2 LED blinking
# uvcdynctrl -s "LED1 Mode" -- 3 LED on

# 장치가 여러개 잡혀있을 때 명시적으로 지정
# uvcdynctrl ( --device=video0 ) -s "Pan/tilt Reset" -- 1


3. uvdynctrl 문제


a. uvdynctrl이 오래된 라이브러리이고, 더 이상 업데이트가 안됨.

b. tilt는 되지만, pan이 명령이 없음. 저 같은 경우는 추가해주었기 때문에 'pan (relative)'가 있습니다.


명령 추가해줍니다.

sudo vim /usr/share/uvcdynctrl/data/046d/logitech.xml

문자열 찾기 : V4L2_CID_PAN_RELATIVE

2008년도에 Pan 관련해서 업데이트를 했다고 합니다. 


문자열 찾기 : V4L2_CID_TILT_RELATIVE


저 같은 경우는 노란색으로 부분 ID 쪽에 공백으로 돼있었습니다. 


V4L2_CID_PAN_RELATIVE 추가해주면 됩니다. 


추가가 되었으면, 

uvcdynctrl --import=/usr/share/uvcdynctrl/data/046d/logitech.xml


혹시 모르니 재부팅도 해줍니다.

sudo reboot


4. 그래도 안 될 경우 


docs.ros.org/en/jade/api/tuw_uvc/html/dynctrl-logitech_8h.html#a193f86e1414943187cb3c847358c0275


tuw_uvc: dynctrl-logitech.h File Reference

Go to the source code of this file. Define Documentation Value: { \ 0x82, 0x06, 0x61, 0x63, 0x70, 0x50, 0xab, 0x49, \ 0xb8, 0xcc, 0xb3, 0x85, 0x5e, 0x8d, 0x22, 0x56 \ } Definition at line 36 of file dynctrl-logitech.h. Value: { \ 0x82, 0x06, 0x61, 0x63, 0x

docs.ros.org

혹시 모르니, 위 URL에 맞춰 value 값을 바꿉니다.


V4L2_CID_PAN_RELATIVE = 0x009A0904 
V4L2_CID_PAN_RESET = 0x009A0906
V4L2_CID_TILT_RELATIVE = 0x009A0905 
V4L2_CID_TILT_RESET = 0x009A0907


728x90
반응형

+ Recent posts