반응형
안녕하세요. 아두이노 MQ Series PPM으로 변환하기 번외 편입니다.
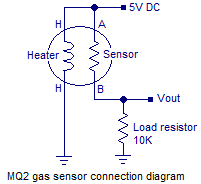
저번 글은 회로도를 보았고, 오늘은 파이썬으로 PPM으로 변환하도록 하겠습니다.
파이썬으로 굳이 사용한 이유는 급하게 실험하느라, 센서 값을 PPM으로 변환하지 않고 그대로 CSV파일 형식으로 받았기 때문에 파이썬으로 데이터를 전처리해야만 했습니다.
import csv
import numpy as np
import math
import matplotlib.pyplot as plt
"""
PPM
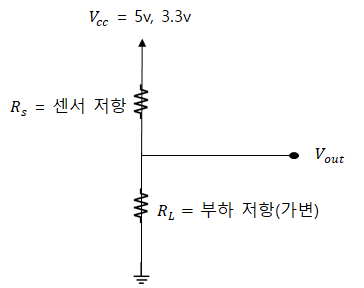
VCC = 3.3V
RL = 10k
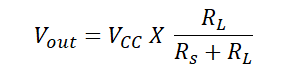
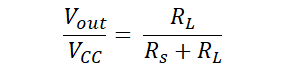
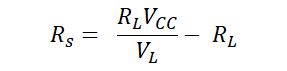
VL = VCC*(RL/(RS+RL)
RS = (RL*VCC)/VL-RL
PPM = a * ratio * b
"""
vcc = 3.3
rl = 10
mq3, mq4, mq6, mq7, mq8, mg811 = 7, 8, 9, 10, 11, 12
# Calculate Rs
def rs_cal(vl):
return ((vcc * rl) / vl) - rl
# Calculate Ro
def ro_cal(rs, num, clean_air_ppm):
ro_tmp = 0
for i in range(num):
ro_tmp += rs[i] / clean_air_ppm
return ro_tmp/num
# Calculate ratio
def ratio_cal(rs_, ro_):
return rs_/ro_
# Calculate PPM
def ppm_cal(ratio, a, b):
return a * pow(ratio, b)
# Calculate logscale PPM
def ppm_log_cal(ratio, a, b):
return (math.log10(ratio)-b)/a
def co2_cal(adc_v):
return pow(10, ((adc_v / 8.5) - 0.220) / (0.020 / (2.602 - 3)) + 2.602)
constant = {"mq3": ['Alcohol', "mq3", 0.3934, -1.504],
"mq4": ['CH4', "mq4", 1012.7, -2.786],
"mq6": ['LPG', "mq6", 1009.2, -2.35],
"mq7": ['CO', "mq7", 99.042, -1.518],
"mq8": ['H2', "mq8", 976.97, -0.688]}
file_name_1 = '2020923_105132.csv'
file_name_2 = '2020923_113418.csv'
file_name_3 = '2020923_125810.csv'
header = ['boot_ms[ms]',
'latitude[degE7]', 'longitude[degE7]', 'relative altitude[mm]',
'local position x[m]', 'local position y[m]', 'local position z[m]',
'mq3', 'mq4', 'mq6', 'mq7', 'mq8', 'mq811',
'PM1.0', 'PM2.5', 'PM10.0', 'ozone', 'gamma']
csv_1 = np.loadtxt(file_name_1, delimiter=",")
# file = np.vstack([header, csv_1])
adc_v_list = []
rs_list = []
ratio_list = []
ppm_list = []
tmp = []
for i in range(len(csv_1)):
adc_v_list.append(csv_1[i][mq4])
for i in range(len(csv_1)):
rs_list.append(rs_cal(csv_1[i][mq4]))
ro = ro_cal(rs=rs_list, num=10, clean_air_ppm=4.4)
for i in range(len(csv_1)):
ratio_list.append(ratio_cal(rs_list[i], ro))
for i in range(len(csv_1)):
ppm_list.append(ppm_cal(ratio_list[i], constant['mq4'][2], constant['mq4'][3]))
time = []
for i in range(len(csv_1)):
time.append((csv_1[i][0]-csv_1[0][0])/1000/60)
print("time :", time)
print("adc_v :", adc_v_list)
print("ro :", ro)
print("rs :", rs_list)
print("ratio : ", ratio_list)
print("ppm :", ppm_list)
print("clean air :", 1012.7 * pow(4.4, -2.786))
plt.plot(time, [300 for _ in range(len(csv_1))], color='red')
# plt.plot(time, [10000 for _ in range(len(csv_1))], color='red')
plt.plot(time, ppm_list, color='green')
plt.xlabel('[Minute]')
plt.ylabel('[PPM]')
plt.title("MQ4 - CH4( 300~10000ppm )")
plt.show()
위 소스코드 같은 경우는 프로젝트에서 중요하다고 생각한 부분만 가져왔습니다.
아래는 PPM으로 변환할 때 필요한 함수입니다.
#  Calculate Rs
def rs_cal(vl):
    return ((vcc * rl) / vl) - rl


# Calculate Ro
def ro_cal(rs, num, clean_air_ppm):
    ro_tmp = 0
    for i in range(num):
        ro_tmp += rs[i] / clean_air_ppm
    return ro_tmp/num


# Calculate ratio
def ratio_cal(rs_, ro_):
    return rs_/ro_


# Calculate PPM
def ppm_cal(ratio, a, b):
    return a * pow(ratio, b)

# Calculate logscale PPM
def ppm_log_cal(ratio, a, b):
    return (math.log10(ratio)-b)/a
그리고 기억은 잘나지 않지만, CO2 센서는 위 공식 말고 다른 식을 사용합니다.
# Calculate CO2 PPM
def co2_cal(adc_v):
    return pow(10, ((adc_v / 8.5) - 0.220) / (0.020 / (2.602 - 3)) + 2.602)
1편
[아두이노] MQ 시리즈 공기질 센서 PPM으로 변환하기! (1) Feat. MQ2, MQ3, MQ4, MQ5, MQ6, MQ7, MQ8, MQ9, MG-811
안녕하세요. 약 두 달만에 글을 씁니다. 공모전과 기사 시험의 지옥을 뒤로 잠시 여유가 생겨 시간을 냅니다. 오늘은 MQ 시리즈에서 공기질 센서를 PPM으로 변환하는 방법에 대해 글을 쓰겠습니
coding-yoon.tistory.com
2편
[아두이노] MQ 시리즈 공기질 센서 PPM으로 변환하기! (2) 회로도 (Schematic)
안녕하세요. MQ시리즈 두 번째 글을 작성합니다. 확실히 글은 바로 바로 작성하는 것이 중요한 것 같습니다. 글을 쓰려고 보니 기억이 안 나서 다시 새로 공부했습니다. 저번 글은 아두이노 라이
coding-yoon.tistory.com
728x90
반응형
'임베디드 > Arduino' 카테고리의 다른 글
| [아두이노 초급] 블루투스 프로젝트 HC-05, HC-06 설정, 팁 정리 (0) | 2022.07.22 |
|---|---|
| [Arduino] Arduino IDE 2.0 베타 사용 후기. (자동완성, 디버깅 등등) (0) | 2022.02.02 |
| [아두이노] MQ 시리즈 공기질 센서 PPM으로 변환하기! (2) 회로도 (Schematic) (2) | 2021.01.21 |
| 아두이노, 안드로이드를 블루투스로 연결해서 센서값 읽어오기!(3) (5) | 2020.12.16 |
| [아두이노] MQ 시리즈 공기질 센서 PPM으로 변환하기! (1) Feat. MQ2, MQ3, MQ4, MQ5, MQ6, MQ7, MQ8, MQ9, MG-811 (2) | 2020.12.01 |